.uasset, .umap, or .fbx) that cannot be merged and require exclusive editing.
Hard locks are available on Studio and Enterprise plans.
How Hard Locks Work
- A lock is per-repository and per-path — each lock applies to a specific path in a specific repo.
- A lock is tied to the user who created it.
- Once a path is locked, only the locking user can commit changes to that path.
- If another user edits a locked file locally, a warning is displayed but the edit is saved. However, committing those changes will be blocked.
- Only the locking user or a repository admin/owner can release the lock.
Locking and Releasing Paths
Using the Desktop or Web App
To lock a path, right-click the file or folder in the tree view and select Lock from the context menu.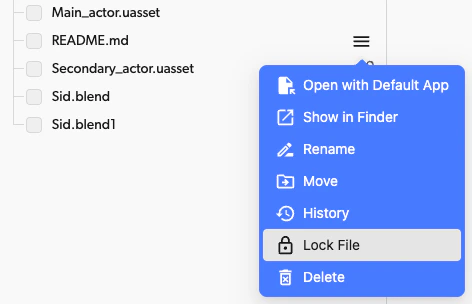
Using the CLI
Lock a path:Auto-Lock
Repository admins can configure file patterns (by extension) so that matching files are automatically locked when a user begins editing them. This removes the need for manual locking on common binary or unmergeable file types.How Auto-Lock Works
- When a user edits a file that matches a configured pattern, Diversion automatically locks it for that user.
- If the file is already locked by another user, auto-lock does not apply — the existing lock is preserved.
Auto-lock is particularly useful for binary files like
.uasset, .umap, or .fbx that cannot be merged and always require exclusive editing.Configuring Auto-Lock Patterns
Auto-lock is a per-repository setting configured by a repo admin or owner.- Click your profile avatar, select Your organizations, then select Repositories in the sidebar and Hard locks in the repository column
- Use the repository picker at the top of the repository column to select the repository
- Add file extension patterns (e.g.,
.uasset,.umap,.fbx) - Save changes

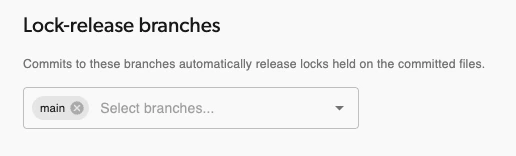
Auto-Release
Locks can be automatically released when the locking user commits changes on specific branches. This is configured alongside the auto-lock settings.How Auto-Release Works
- A repository admin defines which branches trigger auto-release (e.g.,
main,develop). - When a user commits or merges to one of these branches, their locked files included in the commit are automatically released.
Viewing Locked Paths
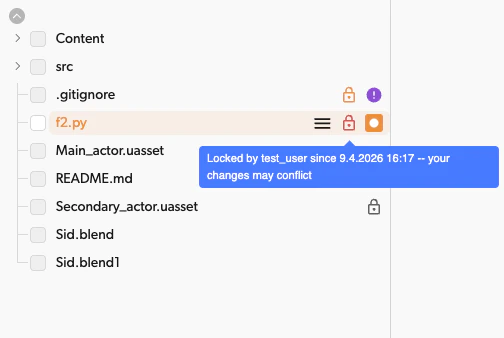
- Desktop or Web App: Lock icons appear in the tree view next to locked paths. Hover over the icon to see who holds the lock.
- CLI: Run
dv lockwith no arguments to list all locks in the repository.