Getting Started
Prerequisites
Before setting up Diversion with Unity, ensure you have:- Diversion installed and signed in (see Quickstart)
- Unity Hub and Unity Editor installed
- Your Unity project created or ready to import
Initial Setup
1
Configure Unity for version control
Open your Unity project and navigate to 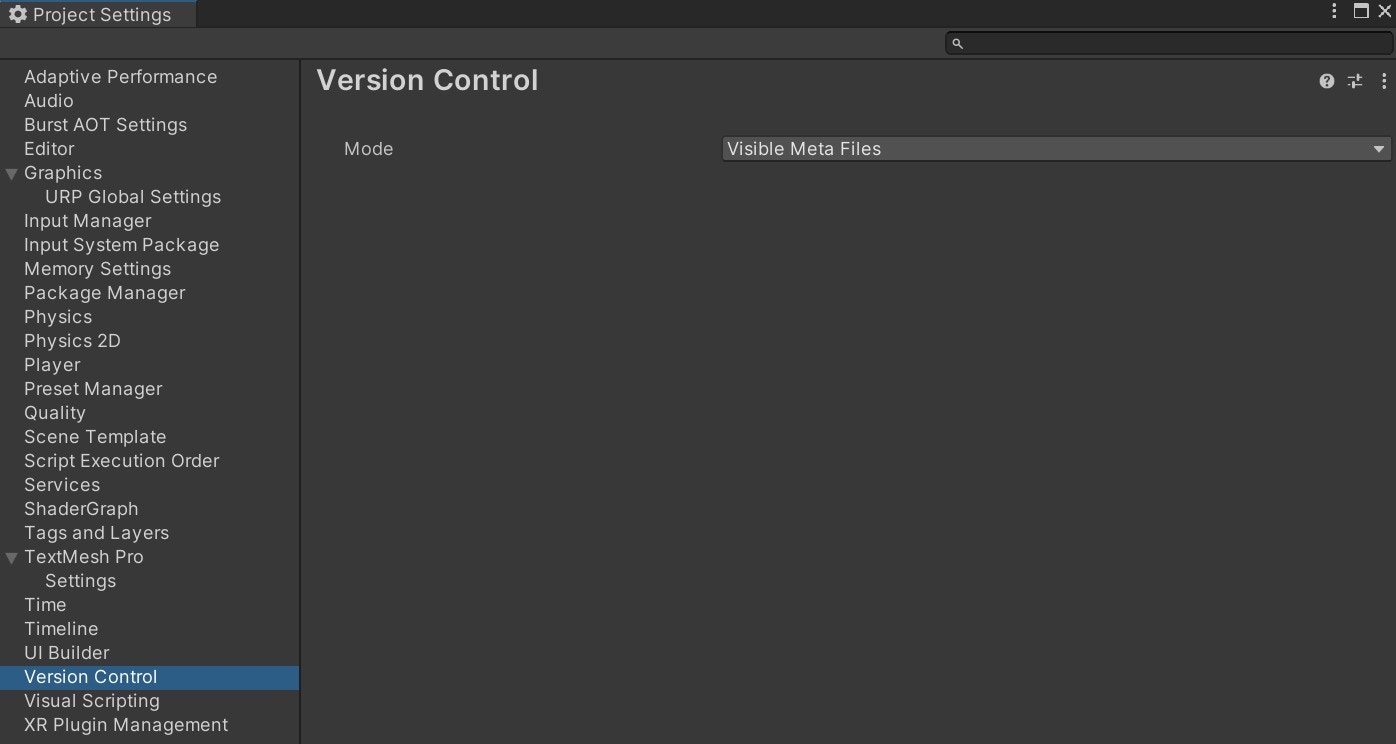
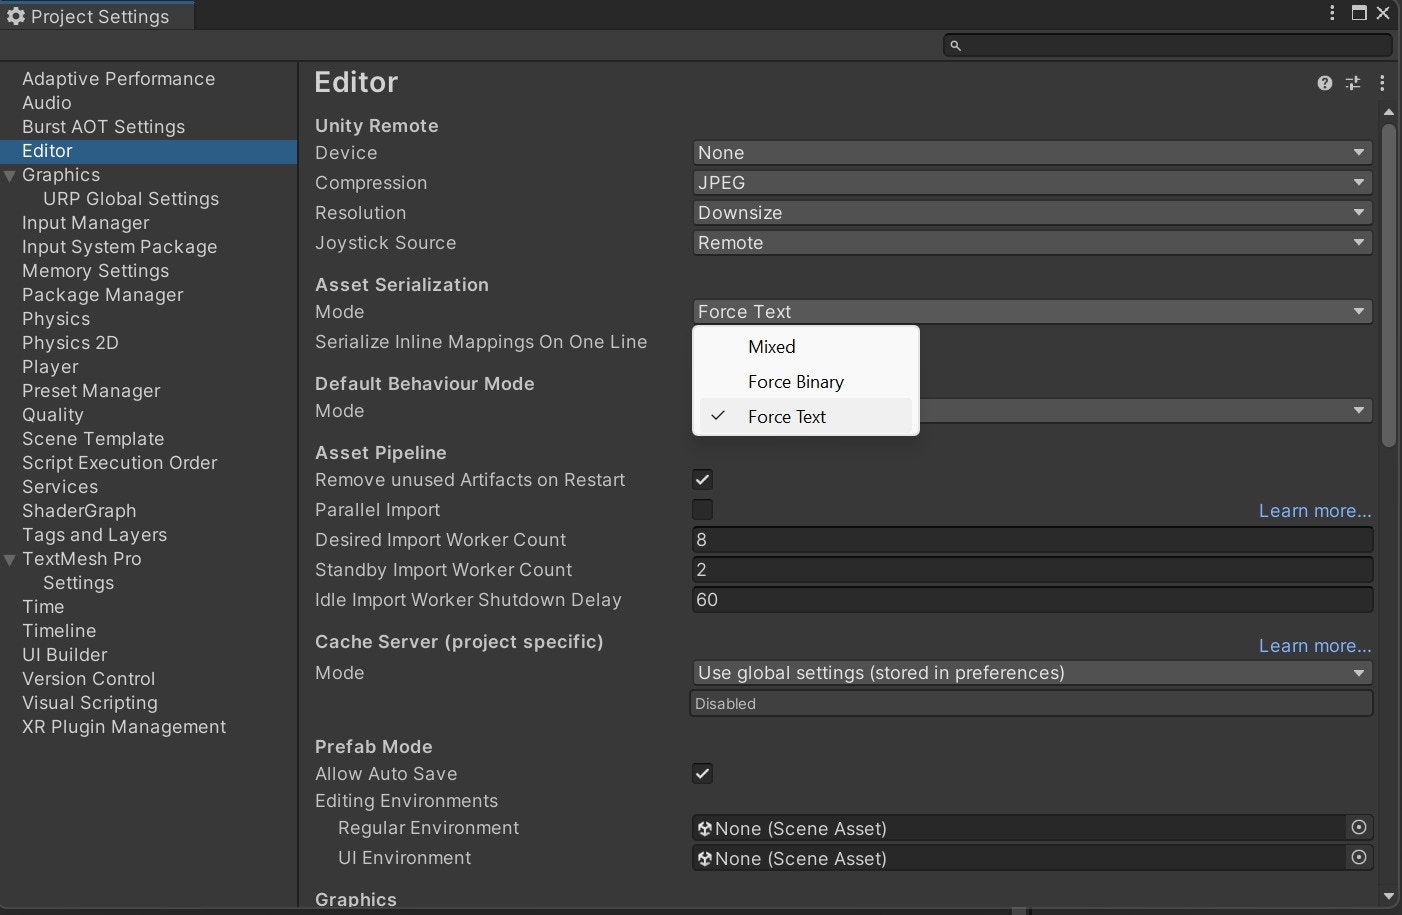
Edit > Project Settings:- Set Version Control Mode to
Visible Meta Files - Set Asset Serialization Mode to
Force Text
2
Verify .dvignore configuration
Note
Diversion automatically creates a
.dvignore file with Unity-specific patterns when initializing a Unity project. You typically don’t need to modify it..dvignore for Unity projects includes common patterns like:3
Initialize Diversion repository
Open the Diversion desktop app and create a new repository from your Unity project folder, or initialize via CLI:Diversion will automatically recognize your Unity project structure and begin tracking the appropriate files, including the appropriate
.dvignore patterns.For detailed instructions on creating repositories, see the Quickstart guide or Start using Diversion.
4
Make your first commit
After initialization, commit your Unity project:Remember: with Diversion, this single command handles everything - no need for separate add, commit, and push commands!
Learn more about commits and Diversion’s auto-sync workflow in the What to do with your changes.
Essential Unity-Diversion Workflow
Meta Files Management
Critical Rule
Always commit meta files together with their corresponding assets. Missing meta files will break asset references and cause errors for your team.
.meta files for every asset containing crucial information like:
- GUID (Globally Unique Identifier) for asset references
- Import settings and configurations
- Platform-specific settings
- When adding new assets, ensure both the asset AND its
.metafile are committed together - If you see missing script references or broken prefabs, check if meta files were properly synced
- Never manually edit or delete meta files outside Unity
File Operations
Important
Always perform file system operations (move, rename, duplicate, delete) through the Unity Editor, never through your OS file explorer.
- Updates all internal references automatically
- Maintains GUID connections in meta files
- Ensures project integrity
- Open Unity Editor
- Use the Project window to rename/move/delete assets
- Save the project (
Ctrl+SorCmd+S) - Commit changes with Diversion
Scene Management & Conflict Prevention
Leverage Diversion’s Conflict Prevention
Unlike Git, Diversion proactively prevents conflicts before they happen:1
Check for potential conflicts
Before editing a scene, open the Diversion desktop app and look for the exclamation mark icon (!) in the file tree. This warns you when someone else is currently editing the same files.
2
Communicate with your team
If you see a potential conflict warning, coordinate with your teammate before making changes. Diversion’s real-time notifications help you avoid stepping on each other’s toes.
Scene Organization Best Practices
Use Multi-Scene Architecture
Use Multi-Scene Architecture
Break large levels into multiple smaller scenes that load additively:Benefits:
- Multiple team members can work on different aspects simultaneously
- Smaller scenes = fewer conflicts
- Better performance through selective loading
Maximize Prefab Usage
Maximize Prefab Usage
Convert reusable game objects into prefabs:
- Use Prefab Variants for different configurations of the same object
- Leverage Nested Prefabs for complex hierarchies
- Edit prefabs in isolation using Prefab Mode
Daily Workflow Best Practices
1. Start Your Day Right
Open the Diversion desktop app to:- Check for any uncommitted changes from your previous session
- Look for exclamation marks (!) on files you plan to edit (potential conflicts)
- See recent commits from your team in the commit history
2. Commit Frequently
With Diversion’s instant sync, frequent commits benefit everyone:- After creating new features: New scripts, prefabs, or materials
- After scene changes: Level design updates or lighting adjustments
- Before switching tasks: Keep work organized and traceable
- End of day: Never leave uncommitted changes overnight
3. Write Meaningful Commit Messages
Good examples:- “Add player jump mechanic with double-jump support”
- “Update level 3 lighting and post-processing”
- “Fix enemy AI pathfinding in narrow corridors”
- “Updated stuff”
- “Bug fix”
- “WIP”
4. Handle Large Assets
Diversion excels at large files, so you can:- Use higher quality assets: Keep uncompressed source files alongside compressed versions
- Store multiple texture resolutions: Maintain 4K/8K textures without worrying about file size
- Include uncompressed audio: Store both WAV/FLAC masters and compressed formats for different platforms
- Create comprehensive atlases: Build larger, more efficient texture atlases without VCS limitations
- Version binary files freely: PSDs, FBX files, and other large assets are handled as efficiently as code
Team Collaboration
Branch Strategy
1
Feature branches for major changes
Create branches for significant features or experiments:Branches in Diversion are instant and lightweight, regardless of project size.
2
Work in isolation
Make your changes without affecting the main branch. Diversion’s auto-sync keeps your branch updated.
3
Review and merge when ready
Once your feature is complete and tested, use Diversion’s built-in review feature to get feedback from teammates before merging.Open the Diversion desktop app to create a review and merge your branch when approved.
Learn more about code reviews and the review workflow in the Review documentation.
Common Issues & Solutions
Missing Script References
Problem: “The associated script cannot be loaded” Solution:- Check if the script’s
.metafile was committed - Verify the GUID in the meta file matches prefab references
- If missing, have the original creator commit their meta file
Broken Prefab Connections
Problem: Prefab shows as disconnected or missing Solution:- Never modify prefab files outside Unity
- Use Prefab Mode for all prefab edits
- If broken, revert the prefab and reapply changes through Unity
Scene Conflicts
Problem: Two people edited the same scene Solution:- Use Diversion’s potential conflict warnings to prevent this
- If it happens, coordinate to manually merge changes
- Consider breaking the scene into smaller subscenes
Best Practices Summary
Do's
- Commit meta files with their assets
- Use Unity Editor for all file operations
- Check potential conflicts before editing scenes
- Commit frequently with clear messages
- Use prefabs and multi-scene architecture
- Configure project settings for text serialization
Don'ts
- Never delete or edit meta files manually
- Don’t move files outside Unity Editor
- Avoid working on the same scene simultaneously
- Don’t commit Library or Temp folders
- Never change asset GUIDs
- Don’t ignore conflict warnings
Troubleshooting
If you encounter issues, check:- Unity project settings (Visible Meta Files, Force Text serialization)
.dvignorefile is properly configured- All team members are using the same Unity version
- Meta files are being tracked and committed