> ## Documentation Index
> Fetch the complete documentation index at: https://docs.diversion.dev/llms.txt
> Use this file to discover all available pages before exploring further.
# Import from Git
> How to get an existing repo from Git into Diversion
export const Image = ({src, alt}) =>  ;
Importing an existing repo from Git can get you quickly up and running with Diversion.
You can also enable bi-directional sync between your Git repo and Diversion, so that
changes made in either place are reflected in the other.
This is a great way to take Diversion for a test drive with no commitment.
To import a repo using the Web UI, follow these steps:
Go to the [Diversion Sync GitHub App page](https://github.com/apps/diversion-sync) and follow the instructions to install it.
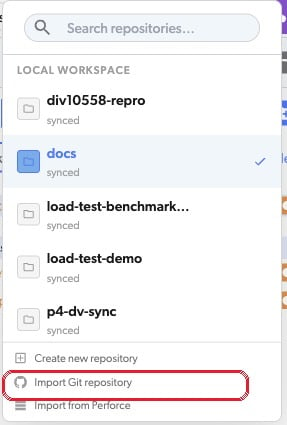
Go to [your Dashboard](https://app.diversion.dev/dashboard), open the repo selector dropdown (top-left), and choose **Import Git repository** from its footer (alongside **Create new repository** and **Import from Perforce**).
;
Importing an existing repo from Git can get you quickly up and running with Diversion.
You can also enable bi-directional sync between your Git repo and Diversion, so that
changes made in either place are reflected in the other.
This is a great way to take Diversion for a test drive with no commitment.
To import a repo using the Web UI, follow these steps:
Go to the [Diversion Sync GitHub App page](https://github.com/apps/diversion-sync) and follow the instructions to install it.
Go to [your Dashboard](https://app.diversion.dev/dashboard), open the repo selector dropdown (top-left), and choose **Import Git repository** from its footer (alongside **Create new repository** and **Import from Perforce**).
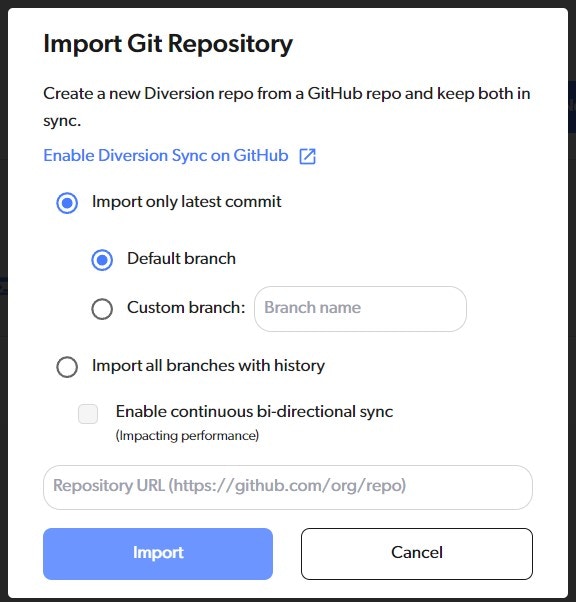 Choose whether you want to import your entire repo and keep all of its history, or just the latest commit from a specific branch.
If you choose to `Import all branches with history`, you'll have the option to `Enable continuous bi-directional sync`.
If you need bi-directional sync, please contact us at [support@diversion.dev](mailto:support@diversion.dev).
This happens in the background, and depending on the size of your Git repo can take a few minutes.
You will receive an email when the import is complete.
To import a repo using the CLI, follow these steps:
Go to the [Diversion Sync GitHub App page](https://github.com/apps/diversion-sync) and follow the instructions to install it.
Open your terminal of choice.
If you want an interactive shell with nicer UI, open your terminal of choice and run the `dv` command.
It works the same as your regular terminal, and you can use any of the `dv` commands (`commit`, `init`, etc...) directly without prefacing them with `dv`.
Run the following command:
```bash theme={null}
dv import [git_url]
```
This will start importing your repo into Diversion with the default name - the same as the repo's name in Git.
There are several optional arguments for the `import` command. You can always run `dv help import` to see them in the terminal.
Passing a repo name to the `import command` will save the repo to Diversion with that name, instead of the repo's name in Git.
```bash theme={null}
dv import [git_url] [repo-name]
```
Enables bi-directional sync between your new Diverson repo and your Git repo. This means that any change you make to one repo will be reflected in the other.
This is useful for testing Diversion or for keeping any Git-based pipelines you have in place.
```bash theme={null}
dv import [git_url] --with-sync
```
If you need bi-directional sync, please contact us at [support@diversion.dev](mailto:support@diversion.dev).
By default, Diversion will import the latest commit from the default branch of your Git repo. If you want to import the latest commit from a different branch, you can use the `--git-branch` flag.
```bash theme={null}
dv import [git_url] --git-branch [branch-name]
```
By default, Diversion will only import the latest commit from the default branch of your Git repo. If you want to import the entire repo with all of its history, you can use the `--with-history` flag.
```bash theme={null}
dv import [git_url] --with-history
```
This happens in the background, and depending on the size of your Git repo can take a few minutes.
You will receive an email when the import is complete.
Choose whether you want to import your entire repo and keep all of its history, or just the latest commit from a specific branch.
If you choose to `Import all branches with history`, you'll have the option to `Enable continuous bi-directional sync`.
If you need bi-directional sync, please contact us at [support@diversion.dev](mailto:support@diversion.dev).
This happens in the background, and depending on the size of your Git repo can take a few minutes.
You will receive an email when the import is complete.
To import a repo using the CLI, follow these steps:
Go to the [Diversion Sync GitHub App page](https://github.com/apps/diversion-sync) and follow the instructions to install it.
Open your terminal of choice.
If you want an interactive shell with nicer UI, open your terminal of choice and run the `dv` command.
It works the same as your regular terminal, and you can use any of the `dv` commands (`commit`, `init`, etc...) directly without prefacing them with `dv`.
Run the following command:
```bash theme={null}
dv import [git_url]
```
This will start importing your repo into Diversion with the default name - the same as the repo's name in Git.
There are several optional arguments for the `import` command. You can always run `dv help import` to see them in the terminal.
Passing a repo name to the `import command` will save the repo to Diversion with that name, instead of the repo's name in Git.
```bash theme={null}
dv import [git_url] [repo-name]
```
Enables bi-directional sync between your new Diverson repo and your Git repo. This means that any change you make to one repo will be reflected in the other.
This is useful for testing Diversion or for keeping any Git-based pipelines you have in place.
```bash theme={null}
dv import [git_url] --with-sync
```
If you need bi-directional sync, please contact us at [support@diversion.dev](mailto:support@diversion.dev).
By default, Diversion will import the latest commit from the default branch of your Git repo. If you want to import the latest commit from a different branch, you can use the `--git-branch` flag.
```bash theme={null}
dv import [git_url] --git-branch [branch-name]
```
By default, Diversion will only import the latest commit from the default branch of your Git repo. If you want to import the entire repo with all of its history, you can use the `--with-history` flag.
```bash theme={null}
dv import [git_url] --with-history
```
This happens in the background, and depending on the size of your Git repo can take a few minutes.
You will receive an email when the import is complete.